Bridging the gap: Bringing QA Automation Closer to DEV
Having dedicated QA-ers on your team is a huge enabler. They bring a critical eye to software quality. But in many development environments, QA is involved too late, often waiting for the frontend to be ready before they can begin testing. This delay slows down feedback loops and limits the impact QA can have earlier in the process.
In this post, we’ll explore how to bring QA closer to development by enabling them to write tests alongside developers. With the right setup and a bit of guidance, it becomes possible to give QA-ers the tools they need to contribute their tests alongside developers, even without a frontend.
The solution I’ll be talking about is definitely not a silver bullet. It is just one of many ways you could approach this type of problem.
Talking the same language
Normally, QA-ers are in a whole different playing field then developers. They are not only involved later into the software development process, but also have a different style of programming when it comes to writing automated tests. While developers write unit tests, QA-ers will typically choose for a more ‘human readable’ approach. A language like Cucumber for example 🥒. Personally, this is what I see happening most of the time.
From my experience, this separation often leads to problems that slow down the development process.
There are mainly two big problems:
- Two separate worlds 🌎: Developers and QA-ers will have no clear view from each other which tests have already been written. This often leads to tests being duplicated. Or worse, missing coverage because each group assumes the other one took care of it.
- Longer feedback loops ♾️: Most of the tests that developers write, are executed inside of a build pipeline, so they execute every time a pull request is made for example. QA will often let their tests execute decoupled from a build pipeline, maybe with a daily scheduler, or after a deploy has happened. This difference primarily comes from the longer execution time of QA-tests, which makes real-time integration with a build pipeline less practical.
The Coffee Maker case ☕
To demonstrate this scenario, I’m going to use a fictive application: the Coffee Maker. All the code for this application can be found in this GitHub repo. So you can follow along if you want.
The application recommends how a specific coffee should be brewed by giving back brewing recommendations. The business logic that does the calculation looks like this:
public async Task<BrewingRecommendationResponse> CalculateBrewingRecommendation(BrewingRecommendationRequest request)
{
    var roastProfile = await context.RoastProfiles
        .FirstOrDefaultAsync(r => r.RoastName == request.RoastName);

    if (roastProfile == null)
        throw new InvalidOperationException("Roast profile not found.");

    if (!Enum.TryParse<BrewingMethod>(request.Method, ignoreCase: true, out var brewingMethod))
        throw new InvalidEnumArgumentException($"Brewing method {request.Method} not found.");

    double baseTemperature = brewingMethod switch
    {
        BrewingMethod.Espresso => 92,
        BrewingMethod.PourOver => 94,
        BrewingMethod.FrenchPress => 95,
        BrewingMethod.AeroPress => 90,
        _ => 93
    };

    double roastAdjustment = roastProfile.RoastLevel switch
    {
        RoastLevel.Light => 2,
        RoastLevel.Medium => 0,
        RoastLevel.Dark => -2,
        _ => 0
    };

    int daysSinceRoast = (request.BrewDate - roastProfile.RoastDate).Days;
    double freshnessAdjustment = daysSinceRoast > 14 ? 1 : 0;

    double finalTemperature = baseTemperature + roastAdjustment + freshnessAdjustment;

    double baseTimeSeconds = brewingMethod switch
    {
        BrewingMethod.Espresso => 25,
        BrewingMethod.PourOver => 180,
        BrewingMethod.FrenchPress => 240,
        BrewingMethod.AeroPress => 90,
        _ => 180
    };

    double densityAdjustment = roastProfile.BeanDensity < 0.68 ? -15 : 0;
    double strengthAdjustment = (request.DesiredStrength - 5) * 5;

    double finalTimeSeconds = baseTimeSeconds + densityAdjustment + strengthAdjustment;

    return new BrewingRecommendationResponse
    {
        RecommendedTemperatureCelsius = Math.Round(finalTemperature, 1),
        RecommendedExtractionTime = TimeSpan.FromSeconds(finalTimeSeconds)
    };
}
For demo purposes, this code is still quite easy to understand. But imagine more complex scenario’s then this, where the input of a QA-er could be of immense value.
Let us also assume that this backend service is connected via IoT-Technology to some real coffee machines that receive the brewing recommendation directly and can start preparing the coffee without human interference. And before you ask, there isn’t any budget to make a digital twin out of it. 😉
So yeah, QA can just run test cases manually right? By physically brewing 47 cups of coffee before lunch. What could go wrong?
But all jokes aside, that’s obviously not a sustainable approach. And in reality, QA probably isn’t planning to stand next to a machine all day. So what are the alternatives?
What about manually testing through the API?
That’s a start, but in this case, we’re aiming for automated tests.
Alright, so we write automated tests directly on the API?
Not quite. Those would hit our real database. Things like
RoastProfileswould need to be cleaned up constantly, not ideal.
Fine, let’s spin up a separate TST environment and clean up the DB after each run?
Tempting, but still not good enough. That setup likely won’t run inside a build pipeline. And without fast, reliable feedback, the value of those tests drops significantly.
So we want: automation, mocked external services, and fast feedback. Is that even possible?
Actually, yes. It might sound unfamiliar to many QA engineers, but it’s something we as developers do all the time when writing integration tests.
Ok, so we want to let out QA-ers write integration tests alongside us? Let’s see how we can make this work.
Finding common ground
Like I talked about before, QA-ers will often choose a more readable language to write their automated tests. So, in order for them to contribute, we need to agree on a format for writing these kinds of tests.
The format doesn’t necessarily need to follow a format like Cucumber, it could take many forms like:
- CSV files
- JSON files
- Text files
- etc.
But Jarne, the Cucumber language is always the go-to option, right? While Cucumber’s 🥒 Given-When-Then syntax is an option, it may not be the best choice for lightweight integration testing. Writing Given-When-Then scenarios can introduce additional overhead, making Cucumber less ideal for simple test cases. Therefore, depending on your specific needs, Cucumber might not be the most efficient choice.
I’m going to use JSON-files for this example. The most important thing here is that the QA-er needs to feel comfortable writing in a specific format. When a format is agreed upon, we need to think about which type of files need to be provided.
When testing via the API, and mocking away external dependencies like your database, there are usually three types of files that we are interested in:
- A setup file used to seed the database
- A request file used for sending the request to the API
- A response file to compare the expected API response against the actual one
In more complex use cases, it could be the case that you need multiple setup files. ☝🏻
After that, we can start thinking about the folder structure for representing these test cases in our code. For the Coffee Maker application, I have chosen the following setup:
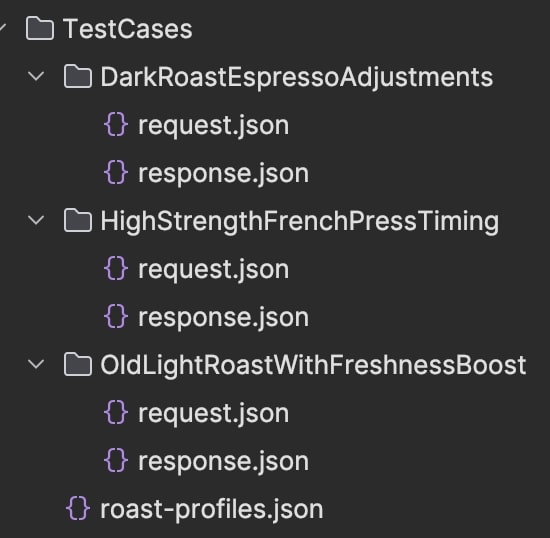
The roast-profiles.json file contains our setup and is placed at the root level, as it’s unlikely to change frequently. Then we have a folder for each test-case. Every test-case folder will have its own request.json and response.json file.
With all of this in place, we can move on to the actual test setup for reading out these files.
Gluing it all together
For this example, I’ve chosen to work with JSON-files. But in the end, the implementation of the setup will be pretty much the same, regardless of which type of files you choose. Most test frameworks will have an option to dynamically define test cases in any format you want. xUnit - which I’m using in this case - will have a Theory attribute that you can place on a test. Theory-tests are tests which are fed various bits of data from a data source, in this case, our JSON-files.
The test definition will look like this:
[Theory]
[FileData("TestCases")]
public async Task GetBrewingRecommendation_ShouldReturnTheCorrectResult(TestCase testCase)
{
    // ...
}
Our TestCase is a custom defined class that holds all the information we need to run each test case:
public class TestCase
{
    public required string Name { get; set; }
    public Dictionary<string, string> Attachments { get; set; }

    public required BrewingRecommendationRequest Request { get; set; }
    public required BrewingRecommendationResponse Response { get; set; }
    public required List<RoastProfile> RoastProfiles { get; set; }

    public override string ToString()
    {
        return Name;
    }
}
Notice that we are overriding the
ToStringmethod here. xUnit will by default use theToStringmethod on complex objects to represent the name of a specific test case. We’re going to use this to our advantage.
We still need to find a way to read out these JSON-files. If you look back at our test, we also defined another attribute: FileData("TestCases"). This is a custom implementation based on the DataAttribute from xUnit. The only method you need to override is the GetData() method, which will, get your data of course!
public class FileDataAttribute(string baseFolderPath) : DataAttribute
{
    public override async ValueTask<IReadOnlyCollection<ITheoryDataRow>> GetData(MethodInfo testMethod, DisposalTracker disposalTracker)
    {
        var cases = await GetTestCases(baseFolderPath);

        return new ReadOnlyCollection<TheoryDataRow>(cases.Select(x => new TheoryDataRow(x)).ToList());
    }
}
The parameter we have defined here represents the base path where our “TestCases” are located. For now, this will direct us to the root path. This setup allows you to specify a more specific base path, which is useful when you have many test cases and want a more granular way to organize or run them, for example by category.
Now all that’s left to do, is extracting the test cases from the JSON-files:
private async Task<List<TestCase>> GetTestCases(string path)
{
    var cases = new List<TestCase>();
    var directoryInfo = new DirectoryInfo(path);

    var roastProfiles = await GetRoastProfiles(directoryInfo);

    foreach (var directory in directoryInfo.GetDirectories())
    {
        if (directory.GetDirectories().Length == 0)
        {
            var request = await GetJsonContent<BrewingRecommendationRequest>(directory, "request.json");
            var response = await GetJsonContent<BrewingRecommendationResponse>(directory, "response.json");

            cases.Add(new TestCase
            {
                Name = directory.Name,
                RoastProfiles = roastProfiles,
                Request = request!,
                Response = response!,
                Attachments = _attachments
            });
        }
        else
        {
            cases.AddRange(await GetTestCases(directory.FullName));
        }
    }

    return cases;
}
This method supports recursion to handle folder structures with multiple nested levels. If you include more specific setup files for certain test cases within subfolders, those will take precedence over the more generic configurations found higher up in the hierarchy 💡
As a small bonus, the Coffee Maker application uses the brand-new xUnit V3 framework, which brings some exciting new features. One particularly handy addition is the simplified process for uploading attachments. I took advantage of this by uploading all the JSON files used in each test case as attachments. This makes them accessible after a test has been executed.
var serializerOptions = new JsonSerializerOptions { WriteIndented = true };
TestContext.Current.AddAttachment("actual-response.json", JsonSerializer.Serialize(responseContent, serializerOptions));

foreach (var attachment in testCase.Attachments)
{
    TestContext.Current.AddAttachment(attachment.Key, attachment.Value);
}
And there you have it! A lightweight, low-effort implementation that both DEV and QA can easily understand and collaborate on together. 🤝